How to Create Free Tier AWS Account
I hope all of you are have read my previous post Introduction To AWS (Amazon Web Services) in which i gave a brief introduction on AWS and some of the major AWS services.
So now what is the best way to learn AWS ? Answer is get your hands dirty on AWS services. And in order to get your hands dirty on AWS , you need an AWS account.
Create AWS account for free step by step
Now, there’s good news, you can get started with AWS for Free. AWS offers 12 months of Free Tier on new accounts. Users can access AWS services for free such as S3, EC2, DynamoDB, etc. There are some limitations to using AWS resources.

Step 1 : Open below link in web browser.
https://portal.aws.amazon.com/billing/signup#/start
Step 2 : In this page, you need to provide your email address, any password of your choice and account name for your aws account. You can use any email id for sign up but remember this will be your root user. So you need to have access to this email id , if in case you lose your aws credentials or get locked out. Also account name can be changed in future also as per your choice.

Step 3 : Now you will be asked to enter your contact information. If you are working somewhere you may wanna choose “Professional” as your account type, otherwise, you can always choose “Personal” account.
Enter your information, check the checkbox. If interested, read the AWS customer agreement and click on “Create Account and Continue” button.

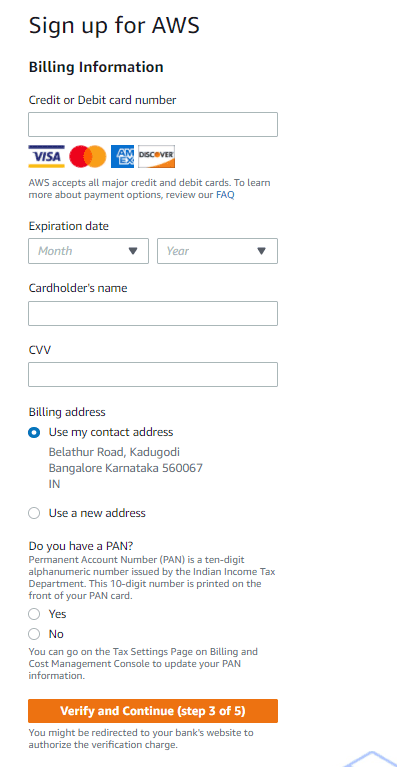
Step 4 : Now you need to enter the payment details . To use AWS you must enter your Debit or Credit card details.
Don’t worry, your card details will be secured with AWS and you won’t be charged unless you go out of Free Tier.
Also you can set up billing alarms to restrict your expenses on AWS. We will discuss in future posts about how to create billing alarm.
Step 5 : You need to verify your phone number. Select your country code, enter your phone number and the given security code. You can receive verification code on Text/Voice call as per you choice.
After you have verified your phone number, you will see the following success message.

Once you enter the verification code, you will see below message.


Step 6 : Users can select any Amazon Web Service support plan from the support plane page. Users can get descriptions and benefits of AWS from AWS support plans. As a beginner and for personal account , select basic support. It is free of cost.


Step 7 : If everything is right your AWS account will be created and you will be redirected to the registration confirmation page. Click ‘Sign In to the Console’ to check if your account is activated


Step 8 : Click on Sign in button. Enter in the email address that you used for your Free Tier account. Click Next and then enter in your password.
If your account is activated, you will be redirected to your AWS console page which looks like below image :


Note: Sometimes you may not be able to login to your AWS console just after the account creation, please wait for 24 hours and then try to log in again. If you are still not able to login to your console then you have to raise one support request to AWS. The same goes for payment if you already made the payment but still not able to login to your console then raise one support request.
Thanks for reading this . I hope at the end of this article , you all have created your free tier AWS account.

Service Models In Cloud Computing

How to Create Free Tier AWS Account
